Here is a video I made that I hope will show some of the techniques I have been using. Its of my work from week2 as I thought it would be a nice section to use.
I plan to talk about Polypaint and Layering. I will show why and how I use them. This should add to the other blogs where I might of mentioned them or given a brief exploration.
Tuesday, 29 November 2011

Last Test
 Here is my last Sculpt! This was truely the hardest and most complex!
I took the sculpt of the bent knee sculpt and cut the bones out purely in Zbrush! The idea was to use the things I have learnt to try carve the bones out and try get something that represents the bones that would be creating the knee.

So first thing first was to use the Slice tool which cut my sculpt up into different groups. I took those new groups and applied them all to their own layer so now I can work a section without the chance of ruining the other sections that I don't want changed.

The next stage was to sculpt the actual bones from this by cutting and scratching away. However once I had the areas that I highlighted blocked in. I then cut them into their own groups the same way I did previously so I can sculpt and shape all the bones individually.
PolyPaint

Here is a quick image showing how I have used polypaint to draw over my sculpt so when I bend the leg I have a guide to look at and keep the landmarks consistent.
Legs: Final


However I have learnt alot and the first sculpt of something is always the hardest. Especially when there some many different variations and things that can cause problems. However I think there is room for improvement.
Leg Reworks and Development

The sculpt of the leg is getting there! Also the first look at the leg that I have transposed to a 90 degree angle.
Mostly I have had to work on the shapes and the general forms of the muscles. I have worked into the knees alot as they looked off and the structure wasn't right (maybe bad proportions?). Also when I bent the leg I realised muscles looked abit out of place.
The areas in red show the changes that occur once the leg was bent, these muscles are now tensed and straining. Also the area marks in red lines is an area I tried to develop as thats where a long sheet of Tendon attaches to the lower leg which causes this flattened area.
Saturday, 26 November 2011
Legs!
Here is the first look at the leg sculpt. This will be the last set of sculpts I do for this project! After that it will be moving onto full body sculpts which will be outside of this blog. But all these sculpts have been me practicing my anatomy and Zbrush sculpting before I get into complex poses!
So here is the first look at the legs straight. I plan to do a bend at 90 degrees once I get the base sculpt to a good place. At this stage I feel that there is a few shape reworks before moving on but I think I'm nearly ready to start transposing the leg into the bent pose.
 Here are the reworks I plan to do to refine the shape as I think in some areas its become to wide and out of shape slightly. With these changes I think I would be ready to bend the the leg 90 degrees.
As for muscles and the forms that create, I feel that I have gotten them to a good stage and with the adjustments I plan I think I will only need to do small tweaks.
Legs have been a challenge. Placing the anatomy and landmarks was difficult and took alot of time to get to this stage. But was a huge learning experience for me as I really wanted to get the forms of the knee and leg right.
So here is the first look at the legs straight. I plan to do a bend at 90 degrees once I get the base sculpt to a good place. At this stage I feel that there is a few shape reworks before moving on but I think I'm nearly ready to start transposing the leg into the bent pose.
 Here are the reworks I plan to do to refine the shape as I think in some areas its become to wide and out of shape slightly. With these changes I think I would be ready to bend the the leg 90 degrees.
As for muscles and the forms that create, I feel that I have gotten them to a good stage and with the adjustments I plan I think I will only need to do small tweaks.
Legs have been a challenge. Placing the anatomy and landmarks was difficult and took alot of time to get to this stage. But was a huge learning experience for me as I really wanted to get the forms of the knee and leg right.
Sunday, 20 November 2011
Hand Sculpt
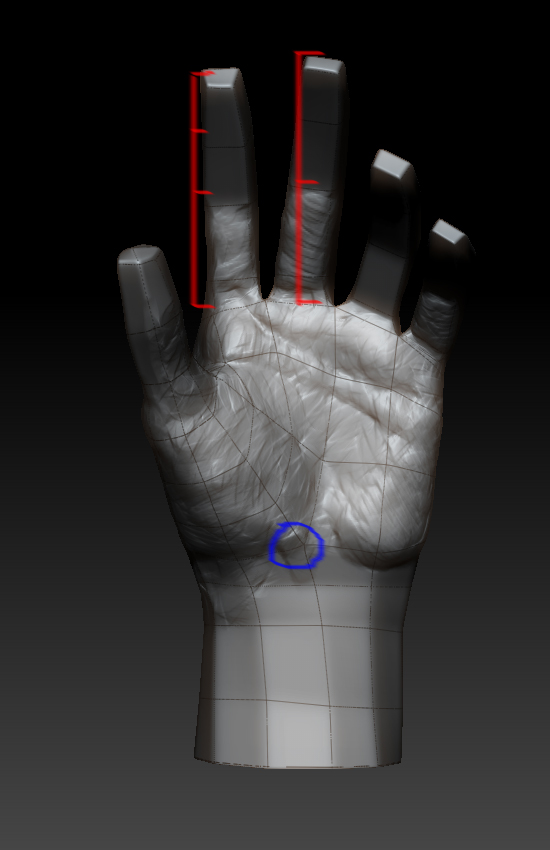


Final images show where I left this sculpt, for now. I have Labbled one of the images 1-4 to try highlight areas that I think I am going right. 1: shows the bones that when the hand is slightly closed press against the surface and created this type of plane change same again image 3. Image 4 shows how I have had to try make sure I get the correct plane changes when there is muscle or bone or sking being pressed, red shows the tendon that runs down my arm, blue which is one of the key muscles of the hand. Finally green is a plane change that is caused by the pose. I have really enjoyed this week, it's teaching me practice really is the key and I plan to keep doing these exercises only concentrating on one thing at a time to perfect my knowledge of the forms!

Subscribe to:
Posts (Atom)