What Have I done on this project and What have I learnt?
During this project I feel I have really pushed myself to get the most of out, I have learnt so much. I have been able to take a lot of theory knowledge and research a step further and really get into it by using it to breakdown images into a great resource to me when going into 3D. Also I have concentrated on some of the most complex sections of the body. I'm afraid I ran out of time to do the feet but the face itself is something that would be a completely different topic as theres a whole new subject to learn when sculpting faces.
I have learnt that form is something that really matters in sculpting. Getting the right form between each muscle and the variation between them. Also the relationship between the boney and muscle landmarks, the hand was a good example of something that I really had to learn how to show that.
How has it Helped me?
The whole process has helped me really get to grips with areas I needed to learn as well as the techniques needed to develop posed models or even models for production (corrective displacements or concept sculpts). Early in the blog I post about what areas I really think will help me.
Whats next?
I plan to keep doing experiments like this constantly and trying to vary the pose or the sculpt so I try new things. Also for bigger use, I want to start developing my own full sculpted figures to really capture a pose, emotion or look of the human form. Even take my knowledge to develop creatures with some anatomical thought behind them.
Has been an amazing project to work on and has taught me that these small tests really help development and progress for the bigger tasks as full body!
Tuesday, 29 November 2011
Video lecture!
Here is a video I made that I hope will show some of the techniques I have been using. Its of my work from week2 as I thought it would be a nice section to use.
I plan to talk about Polypaint and Layering. I will show why and how I use them. This should add to the other blogs where I might of mentioned them or given a brief exploration.
I plan to talk about Polypaint and Layering. I will show why and how I use them. This should add to the other blogs where I might of mentioned them or given a brief exploration.
Last Test
 Here is my last Sculpt! This was truely the hardest and most complex!
I took the sculpt of the bent knee sculpt and cut the bones out purely in Zbrush! The idea was to use the things I have learnt to try carve the bones out and try get something that represents the bones that would be creating the knee.

So first thing first was to use the Slice tool which cut my sculpt up into different groups. I took those new groups and applied them all to their own layer so now I can work a section without the chance of ruining the other sections that I don't want changed.

The next stage was to sculpt the actual bones from this by cutting and scratching away. However once I had the areas that I highlighted blocked in. I then cut them into their own groups the same way I did previously so I can sculpt and shape all the bones individually.
PolyPaint

Here is a quick image showing how I have used polypaint to draw over my sculpt so when I bend the leg I have a guide to look at and keep the landmarks consistent.
Legs: Final


However I have learnt alot and the first sculpt of something is always the hardest. Especially when there some many different variations and things that can cause problems. However I think there is room for improvement.
Leg Reworks and Development

The sculpt of the leg is getting there! Also the first look at the leg that I have transposed to a 90 degree angle.
Mostly I have had to work on the shapes and the general forms of the muscles. I have worked into the knees alot as they looked off and the structure wasn't right (maybe bad proportions?). Also when I bent the leg I realised muscles looked abit out of place.
The areas in red show the changes that occur once the leg was bent, these muscles are now tensed and straining. Also the area marks in red lines is an area I tried to develop as thats where a long sheet of Tendon attaches to the lower leg which causes this flattened area.
Saturday, 26 November 2011
Legs!
Here is the first look at the leg sculpt. This will be the last set of sculpts I do for this project! After that it will be moving onto full body sculpts which will be outside of this blog. But all these sculpts have been me practicing my anatomy and Zbrush sculpting before I get into complex poses!
So here is the first look at the legs straight. I plan to do a bend at 90 degrees once I get the base sculpt to a good place. At this stage I feel that there is a few shape reworks before moving on but I think I'm nearly ready to start transposing the leg into the bent pose.
 Here are the reworks I plan to do to refine the shape as I think in some areas its become to wide and out of shape slightly. With these changes I think I would be ready to bend the the leg 90 degrees.
As for muscles and the forms that create, I feel that I have gotten them to a good stage and with the adjustments I plan I think I will only need to do small tweaks.
Legs have been a challenge. Placing the anatomy and landmarks was difficult and took alot of time to get to this stage. But was a huge learning experience for me as I really wanted to get the forms of the knee and leg right.
Sunday, 20 November 2011
Hand Sculpt
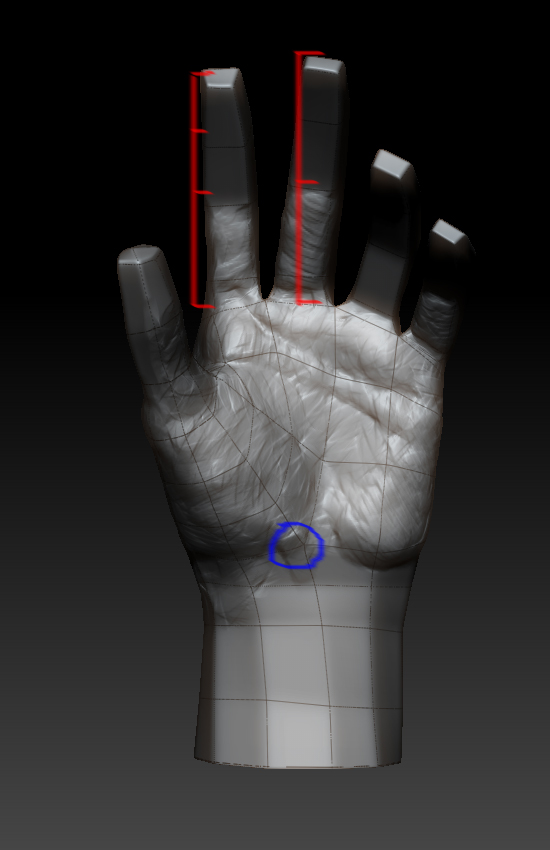


Final images show where I left this sculpt, for now. I have Labbled one of the images 1-4 to try highlight areas that I think I am going right. 1: shows the bones that when the hand is slightly closed press against the surface and created this type of plane change same again image 3. Image 4 shows how I have had to try make sure I get the correct plane changes when there is muscle or bone or sking being pressed, red shows the tendon that runs down my arm, blue which is one of the key muscles of the hand. Finally green is a plane change that is caused by the pose. I have really enjoyed this week, it's teaching me practice really is the key and I plan to keep doing these exercises only concentrating on one thing at a time to perfect my knowledge of the forms!

Friday, 11 November 2011
Arm continued!

This is a draft of all the poses. I am fairly happy with the outcomes as I got all the poses done within 4-5 hours which is hard when I was still learning the muscles.
Seems this image was taken I have smoothed over alot of the muscles as some of the were over modelled and made it look strange so I will try get a render of those out soon.
What I have learnt this week is Arms and how complex and complicated they are even when relaxed. The arm is very tricky as there are many muscles that create the surface form and then in another pose they disappear under another muscle as the other muscle is now flexing. Seriously hard stuff for me this week, finding and keep my landmarks consistent was hard as the arm when its twisting causes so many things to shift out of place.
Wednesday, 9 November 2011
First try at Arms

Arms are very complex and difficult as planes changes alot and muscle create a variation of deformation. If thats not harder enough. The arm can twist, bend, flex and relax in a wide range of articulations so knowing the foundations are key to getting arms to look good.

Top image shows my 90 degrees superannuated so far. Already, there is a long list of reworks.

The images two the right show the areas that need work. The actual placement of the muscles seems ok, but the shape is off and is making the arm look strange and chunky. Also needs a smooth over as the muscles are blocking out and making it look strange.

Sunday, 6 November 2011
Clavicle and Scapula Rotations: Final Thoughts!

Torsos are complete!
Overall I am happy with the out come. I have learnt loads whilist I have been working on this and I think I have improved greatly since last weeks sculpts. I understood everything more.
 Here are all the poses back and front. I think I have captured the forms well.
Looking at them now I have some areas I would like to adjust but overall I think the sculpt works and shows the movement of the body as the arms are raised.
 Hopefully you can see I have added all the changes to the model and tried to bring out the correct forms for each pose as the muscles to change from being relaxed to strained through the move. Good example is teres major that is a big muscle hero muscle on your back which attaches onto the bottom edge of the scapula and tucks under the long head of the triceps (along with the lattsimus dorsi) that creates one side of your armpit. This muscle goes form being quite a prominent muscle when relaxed or arms down but as the arms are raised it stretches a becomes less as the insertion of the muscle is pulling muscle thinner.
 Final Tweaks! Yes I do plan to go over everything once more later on. Here I have already started looking at areas that I feel need adjustment and fixing but for now I'm happy with what I have.
In number 4 I think flattening the pectoralis more would be a good improvement. Also the base mesh needs a slight adjustment to the low proportions. I would like to raise it up slighting, meaning moving up where I have his boxers to the red line. As I think they have slightly been put out of position.
Clavicle and Scapula Rotations: Reworks 2

Ok I have a draft of all the poses and there are some adjustments I feel need to made, mainly around the top of the torso. The pectoralis seems to be abit strange so I want to addresss that as well as against try smooth areas down abit more.

I am feeling the sculpt is going the right way. All the first reworks have really helped me get a better outcome!
Why does this help me in the Industry?
Thought I would take a moment to explain why I feel this is great for my development of being a modeller. First thing is that I am understanding the anatomy of a human, I want to be able to sculpt realistic characters with the correct forms, as there are films out there that have terrible anatomy and it makes things look out of place.
Also the more modelling side is I can learn about topology and where to place my edge flow to relate to the landmarks of the human body as they are the areas we don't want to move as they are bone!
This exercise I'm doing this week also shows something thats becoming huge. Displacement correctives! The idea is the rigger can pose character in say arms raise 180 degrees, and the sculpture/modeller will sculpt the displacement that relates to the pose! so this week is a great example of how thats done and why this is getting to practice adjusting a modelling for different poses.
Finally its another thing I know and bring into my work. The idea of learning about figure sculpting gives me the chance to develop other things that production models.
Clavicle and Scapula Rotations: Reworks 01

ok abit more developed and this is more of an ecorche for me to see if I am placing the muscles that I need in the sculpt. I feel the form is building up and that I getting a nice look to the base pose. Red is showing some of the areas that I want to still smooth down to the lower torso. But the colour scheme to this wasn't organised. Was mainly for me to see if I am making progress on forms and definition for the right muscles. The lower back I'm happy with and feel I am heading in the right direction.
Thursday, 3 November 2011
Clavicle and Scapula Rotations: Draft 01

Ok Clavicle rotations. How do I explain this!
The idea of the experiment this week is arm articulations to see the change in the scapula and clavicle along with the muscles around them.
The sculpt is in 5 parts:
0- Degrees which is what you see here
45,90 135 and 180 degrees are the other poses I will sculpt to show how the scapula moves and rotates as the arms are raised.
 What I will learn from this will be how muscles react to these movements and see how the body changes as the arms move upwards. So I will have to pay attention to the proportions of the chest as it will stretch as arms are raised. Also its a good practice to refine a torso as I can bring what I have learnt from last week to this weeks sculpt.
Here is is! well the first pass at the 0 degrees sculpt. This will be on the base layer so the details be consistent throughout the rest of the poses.
Also you can see I have start to echorche my work, so I can see where I'm going wrong and areas that need adjusting:
In yellow show the trapezius, I feel its abit to uniformed and needs shape as the trapezius is a large muscle that grasps on to many areas of the scapula and I want to try show this as it gives off different definition to the surface in the different areas.
Green! yes green is areas that need smoothing. Im am trying to get away from the over modelling problem so taking a moment to just look has helped me to not do that, so green is the areas I need to smooth out as he is looking abit hulk like at the moment.
Red, the general shape of the abs seems off and oddly proportioned so I will try address that.
Finally blue is just to locate I have placed my landmarks of the clavicle and the scapula!
Subscribe to:
Posts (Atom)