Sunday 30 October 2011

Torso Sculpt Male


Here Is a sculpt I did at the same time as the Female so the same mistakes are lurking. Many of the forms are over modelled and overworked. This is something I have definitely learnt from this week as the subtle changes in planes and shapes will bring my sculpts forward as they will look more realistic and believable.

Some good points that I can take from these first sculpts are the anatomy aspects as I think I have gotten all the elements needed in the sculpt to work from but its just refining the definition and the scale of them that will make it all work together. For example the Abs seem abit irregular and rectangle which wouldn't happen and makes the stomach look stretched when the pose isn't that type of pose. Also a good example of over modelling and needs reshaping are the pecks, they just need to get the planes of the three heads of the pectoralis as at the moment it looks messy.


Torso Sculpt Female


So! Here is the first Sculpt I have worked on. This was a warm up to try put to test of what I have learnt and try get some ideas of good techniques to set up a simple sculpts.

The images show how I used Zspheres to create the basic shape. Here I had the chance to get the pose ready and try start to think of proportions. Then I can convert it to a sculpt able mesh where I block out the form and then slowly add more details to get something like the front and side images of a female figure in this example.

The actual sculpt I am fairly happy with but theres some mistakes that I would want to rework, such as the proportions of the torso. They seem abit to long in the truck which then puts out a few other things. Also was my first attempt at sculpting a female figure, although my reference she was toned I think I over modelled some of the areas. In future I think I will try do a whole rework on things to get rid of over modelling as I think thats a common mistake in sculpts. Less is more it seems to be the case.


Some learning points from this is to make sure proportions are good as they do muck you up so I will develop that more and try to make sure its one of the things I keep in mind when making changes as sometimes you get lost in the sculpt and forget the basics.

Sunday 16 October 2011

Zbrush Sculpting Begins!

Now that I have broken down, researched and completed many exercises and techniques of each component of the body, I feel I have enough knowledge to develop sculpts further and use it to create more realistic sculpts of the body. Also I can look at topology as it will be based around muscles that I have sculpted ready for better animation ready meshes. Also all the exercises have been a great development of how to sculpt and areas that are really noticeable on the surface of the body once in certain positions.

Now I will take what I have learnt and do the same but sculpting now. So I plan to sculpt sections of the body then make quick full body poses to start take what I have learnt into 3D.

Neck Ecorche

The next muscles are very hard to sculpt as there are a few muscles that can vary due to neck orientation and some only show when the neck is raised or shoulders and tensed. Again these images show some of the muscles underneath the chin, these muscles are hard to spot with out the head and neck raised. Sculpting the neck is going to be a challenge as I have seen many attempts with necks and they always seem tensed or unnaturally big, so I think get the right shape and planes of the neck muscles will give great realism to my sculpts.

Full Leg Ecorches


Here is more of a full body exercise now. I have really tried to get all the muscles I can name on this image. The idea of using multiple images really helps see how the planes of the body change and how muscles effect the silhouette of the body. This images really gives me a chance to look at the legs and really try see all the plane changes. Good example of this and something I will need to attempt my self later on is the plane changes between the quads (muscles 28,29,30), Satoruis (49) and the abductors of the inner leg.


Upper Legs Ecorches

In these images I have started to bring in what I know about the legs, I have looked into the upper legs at the moment but plan to move down next week. However the legs are quite a challenge. But this week I have worked on one of my favourite sculpts to date. The image at the bottom is something I would love or recreate in 3D. So working on this sculpt was a really plus for me and taught me alot as the material is dark so finding some of the landmarks and placements was quite hard! The mix of having real reference and image of sculpts is really interesting to me as artists 150 years ago or more were getting these things right and they didn't have the resources we have nowadays.


Research: Legs

Here are a selection of images and diagrams I have been following in Dr Richers book explaining the quite complex setup of the legs and knees. I really wanted to grasp the idea of how Knees work as they are big noticeable section of the leg that everyone can recognise as being wrong or right. Some of the key muscles that make up the deformation of the legs are the Vastus lateralis, Rectus Femoris and the Vastus Medialis. The make up the deformation above the knee that we normally  refer to as the quadricep muscles. Also the Gastrocnemius muscle which are known as the calf muscles. 
Here are more articulations of the knee. I have this many images of different positions as the knee changes and creates different planes once moved so I thought it was important to try look as many examples of knee placements. Also alot of muscle deformation happens as the bones move so different muscles will work when its bent than when its straight. Same with the arm muscles the Bicep is flexed when palm is facing up but relaxed when facing down.

Upper Body!

Now I have research the whole upper body (minus head and hands). I have used a new technique using drawings made by Brague with a similar image with a real model. The idea is to fill in the drawn image with the correct muscles. The drawing shows great silhouette of the body where muscles overlap and intersect by having a simple line crossing another. This gave me enough information to place all the muscles on the body.

For the Arm muscles there are several section of muscles that I had to learn and locate. First set of muscles were the Triceps with the 3 different sections, being medial, lateral and long head of the triceps. The Extensor muscles that are found on the lateral side when the palm is facing forward and then the Flexors on the medial side which.

The Extensor muscles consist of the Extensor carpi radialis longus, Extensor carpi radialis Brevis, Extensor Digiti Minimi, Extensor Carpi Ulnaris and finally Extensor pollicis brevis and longus. All these muscles form the lateral side of the forearm. A nice fact is that there is a muscle named the Brachioradilais longus runs along side the Extensor carpi radialis longus and appear that they form one muscle that is noticable on everyones arms (labelled 11 in the image above).

Looking at the Back muscles!

Ok Back Muscles, very complicated at first. But again with the help of landmarks it can be easily laid out. Latissiumus Dorsi (attatchments: origin, from the Spinious process of the six last thoracic vertebrae and all the lumbar vertebrae: from the sacral vertebrae; from the iliac tuberosity; from posterior third of the iliac crest) is a thin muscle that covers quite a big section of the back. However when the body is articulated other muscles such as the Serratus Anterior/interior the spinal erectors which are big clumps of muscle that look like think columns at the base of your back.

First look at the Deltoids, which form the big bulk at the top of the arm: Attachments origin, from the clavicle (lateral third of the anterior border) from the scapula and its external border of the acromion all attaching to the Humerus. Another example of the clavicle being a big landmark to place.


Above is the Trapezius, it attaches to several landmarks, being the Seventh cervical vertebrae, Clavicle (Acromion process) and finally the medial border of the Scapula.


In these two images the Scapula Section of the Deltoid (labelled 6 for image above and 1 for image to the left) it shows that the muscles tendon that travels back to the scapula. In this space there wouldn't be any deformation as the tenders don't contract so it key when placing these muscles I think about the tendons as these will be mostly flat areas.


Torso

Now time for Ecorches over the real reference and art work from the ages. The Torso is a very interesting section to work with and I feel I have learnt loads from developing the idea of the landmarks as its a great bases for the placement of the rest of the muscles.

Here you can see the quite noticeable digitation of my favourite muscle so far the Serratus Anterior (origin, from the first eight or nine ribs, Lateral Surface. Insertion, into the spinal border of the Scapula). You can see where it intersects with the External Obliques.


Again Art work shows the amazing knowledge artist knew over 200 years ago. The Pectoralis is well placed in these two images and show the place where the three heads interact with each other near the arm pit, where the muscles create obvious surface deformation.


Torso: Research

For this bit of research I drew over the skeletal images from the book. I wanted to break dow the torso and understand the placements of each muscle as for example the Pectoralis muscle is made up of three different heads that all start from different areas of the rib cage and land on different areas of the Humerus. First head derives from the Clavicle and attaches lowest down on the Humerus of the three. Second is the sternal section that attaches in the middle, with the third section of the muscle that attaches to the Abdominal Fasiciuli. These sections overlap and intercept eachother. I will show the result that this causes over real reference.


The Abdominal Muscles are a very interesting set of muscles. The Rectus Abdominis is attaches on the fifth rib with the External Oblique attaching to a big long tenderise sheet called the Abdominal Fasiciuli which go underneath the Rectus Abdominis.


Here are some great images from the ages that show the construction of the torso. Da Vinci shows the construction well of the Pectoralis muscles.


Thursday 13 October 2011

Skeleton: LandMarks

For development I labelled a Skeleton with all the Landmarks of the body that I would need to identify and use when sculpting figure.


The Scapula is a landmark of the back that has the several muscles that attach to it as well as another land mark which is a square shape indent on your shoulder called the Acromion Process.


Here I have identified the Landmarks on a real human reference. This is something I plan to do through my research is to draw over images and draw diagrams to develop my knowledge before I get into sculpting segments of the body.


Also I will do it over Art work/Sculptures that were done centuries ago and by some of the best known artist like Da Vinci and Michael angelo and show they they knew what they were doing when they constructed their works.


Skeleton: Research


Here are diagrams I been looking at the landmarks of the skeleton that are visible on the surface of the skin. The idea of this is that give us a starting point to base out models on. The sksleton has areas around thr body that give deformation that is noticable on the skin, these are key areas for modellers as areas of topology and where to start sculpting. These diagrams were a way for me to try memories what I have been learning from the books. I took the images from the book that were just on the skeleton and drawn over in red the area that you see on most human bodies. Some of them do vary from individuals depending sometimes on gender and weight. But even with these differences, ther land marks will always be there as they are skeletal landmarks that everyone has.


To the right shows the landmarks for the Legs. The key Areas that I found out that are key placements are the Head of the Fibula and the Medial surface of the Tibia. Getting these aswel as the Patella would set up most of the leg muscle placements and proportions.

The Greater Trochanter was a very interesting bone for me as it shows the angled bone called the Femur. That along with one of the main landmarks of the body. The Anterior Superior Ilia Spine which for me is the most important landmark along with the Clavical. You would measure the person you want to use as reference to get the placement and distant between the each side of the iliac crest to get the right width and depth of the body.


The Ulnar Furrow is a very key placement for me also for the arm as the extensors are the laterial side of the bone with the Flexiors that flex the fingers are on the medial side so there is a difinative line between the two and you can see this on your own arm.


Scott Eaton: Anatomy & Form

Someone that Looks into Anatomy for Figure Sculpting and VFX is an Artist called Scott Eaton (http://www.scott-eaton.com/). I have had the change to learn from him and work with him on a Feature that is due to release next year.

Here are some of his work that show the use of Anatomy and Form, both in human and Creatures models.

The model to the right is of Scotts sculpt based on the Greek myth Prometheus. He started off drawing the poses and developing the look of the sculpt before he got into 3D.

After I spoke to him about this sculpt and see his lecture. I learnt about the importance of research and reference. As he drew loads of concepts and had a solid idea. Also the development of the muscles start off with the idea of landmarks and blocking in muscles start from lower subdivisions.

Below shows a tutorial that he made called "The Archer", here he gave a quick insight on creating human form and developing a pose.


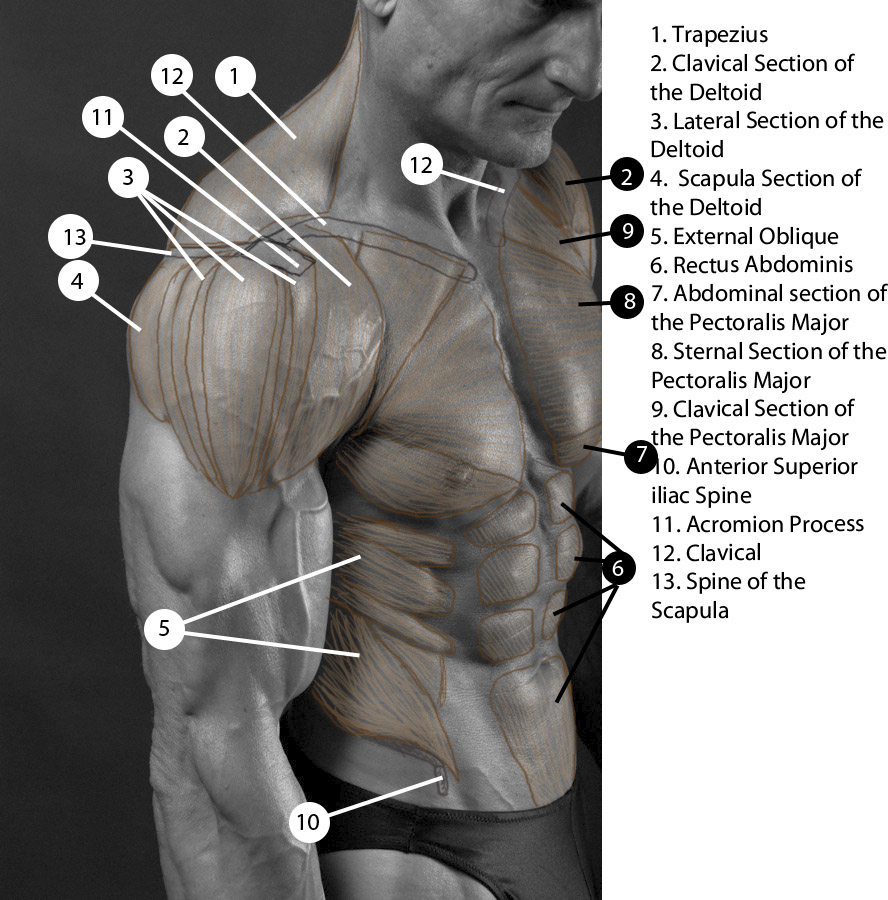
Also you see an example of an ecorche and how this can help you use reference to more of an exercise as well as critiquing your own drawings or Sculpts.


Below shows how Scott takes anatomy and applies it to creatures and concept art to give it that more belivable and he knows about Animal anatomy as well as again animals and creature design is becoming a big thing in the industry so knowing how to develop a realistic anatomy structure behind the model only strengthens the concept.

The image of his Centaur is a great example of taking that knowlege and creating a unique but realistic design. Creating this model he took into mind the proportions of the horse with the human part of the body as if the horse part is too big, would the spine able to take the wait? or again with the human part was to big. would he be able to stand up without falling over.
Also he thought about how the abdomin of the human would merge with the horse so he had to think about new landmarks and how would the skeleton would work.

To the left is how to bend what you know. This is an example of Scotts idea of a Frankenstein style character. He has taken the idea of many different humans being sown together and played with the proportions and muscle deformations but still keeping the structure for it to seem real.


Books Resources


Below are images showing the two books I have found & will use to learn about Anatomy and ideas on how to improve on my knowledge such as different techniques I could use to develop with.

First book is "Figure Drawing: Design and Invention" by Michael Hampton. This book is about getting form and Anatomy in your drawings. The idea is breaking down the figure into shapes and to start of simple by capturing the form, contours and deformation muscles and bones create on the surface.

I can use this book as a great start to maybe start to develop my own drawings before I get into 3D, so I can already develop a pose with basic structure before I get modelling.


Also the taking the idea of drawings further and into more a technical way, these images show to develop the idea of placements of muscles and bones with drawings, even in 3D this can be done. 

I have learnt about Landmarks, which are boney placements you see on the surface on the skin. These are a way to start developing your muscles as you can start to sculpt from the landmarks as you know what muscles start where based on them.

The two images show this well how this is useful because you can see what muscles will move where when the arm is moved/raised. The bottom image shows this well and the muscles all based off of the Clavicle (collar bone) and how the peck muscles attach to the arm.

I will be using this book more to try develop my own breakdowns and how to look at my sculpts/drawings in a more technical way.


The Artistic Anatomy by Dr Paul Richer as most likely been the best reference book I have ever bought! it has everything I am learning and using as reference for the bones, landmarks and muscle insertion points.

Sorry about the poor images but alot of the points and information I will give about the body will be from this book!